Code Commit Repository에 Dockefile 및 buildspec.yaml 추가하기
buildspec.yaml 추가하기
-
(선택사항) 다음의 링크에서 https://us-west-2.console.aws.amazon.com/cloud9/home?region=us-west-2 에서 containerhol 워크스페이스에서 Open IDE 버튼을 눌러 Cloud9 워크스페이스를 누릅니다.
-
워크스페이스의 터미널 창에서 다음의 명령어를 실행하여 Code commit reposotory를 클론한 디렉토리명을 확인합니다.
cd ~/environment/
ls -al
다음과 같이 출력이 됩니다.
ls -al total 20 drwxr-xr-x 4 ec2-user ec2-user 4096 Jun 17 04:39 . drwx------ 15 ec2-user ec2-user 4096 Jun 17 04:29 .. drwxr-xr-x 3 ec2-user ec2-user 4096 Jun 12 05:19 .c9 drwxrwxr-x 3 ec2-user ec2-user 4096 Jun 13 07:08 containerhol -rw-r--r-- 1 ec2-user ec2-user 569 Jun 3 09:22 README.md -
다음의 명령어를 실행하여 디렉토리 안으로 이동합니다.
cd containerhol -
다음의 명령어를 실행하여 git repository의 상태를 확인합니다.
git status다음과 같이 출력이 됩니다.
blackdog-dev:~/environment/containerhol (master) $ git status On branch master No commits yet nothing to commit (create/copy files and use "git add" to track) blackdog-dev:~/environment/containerhol (master) $ -
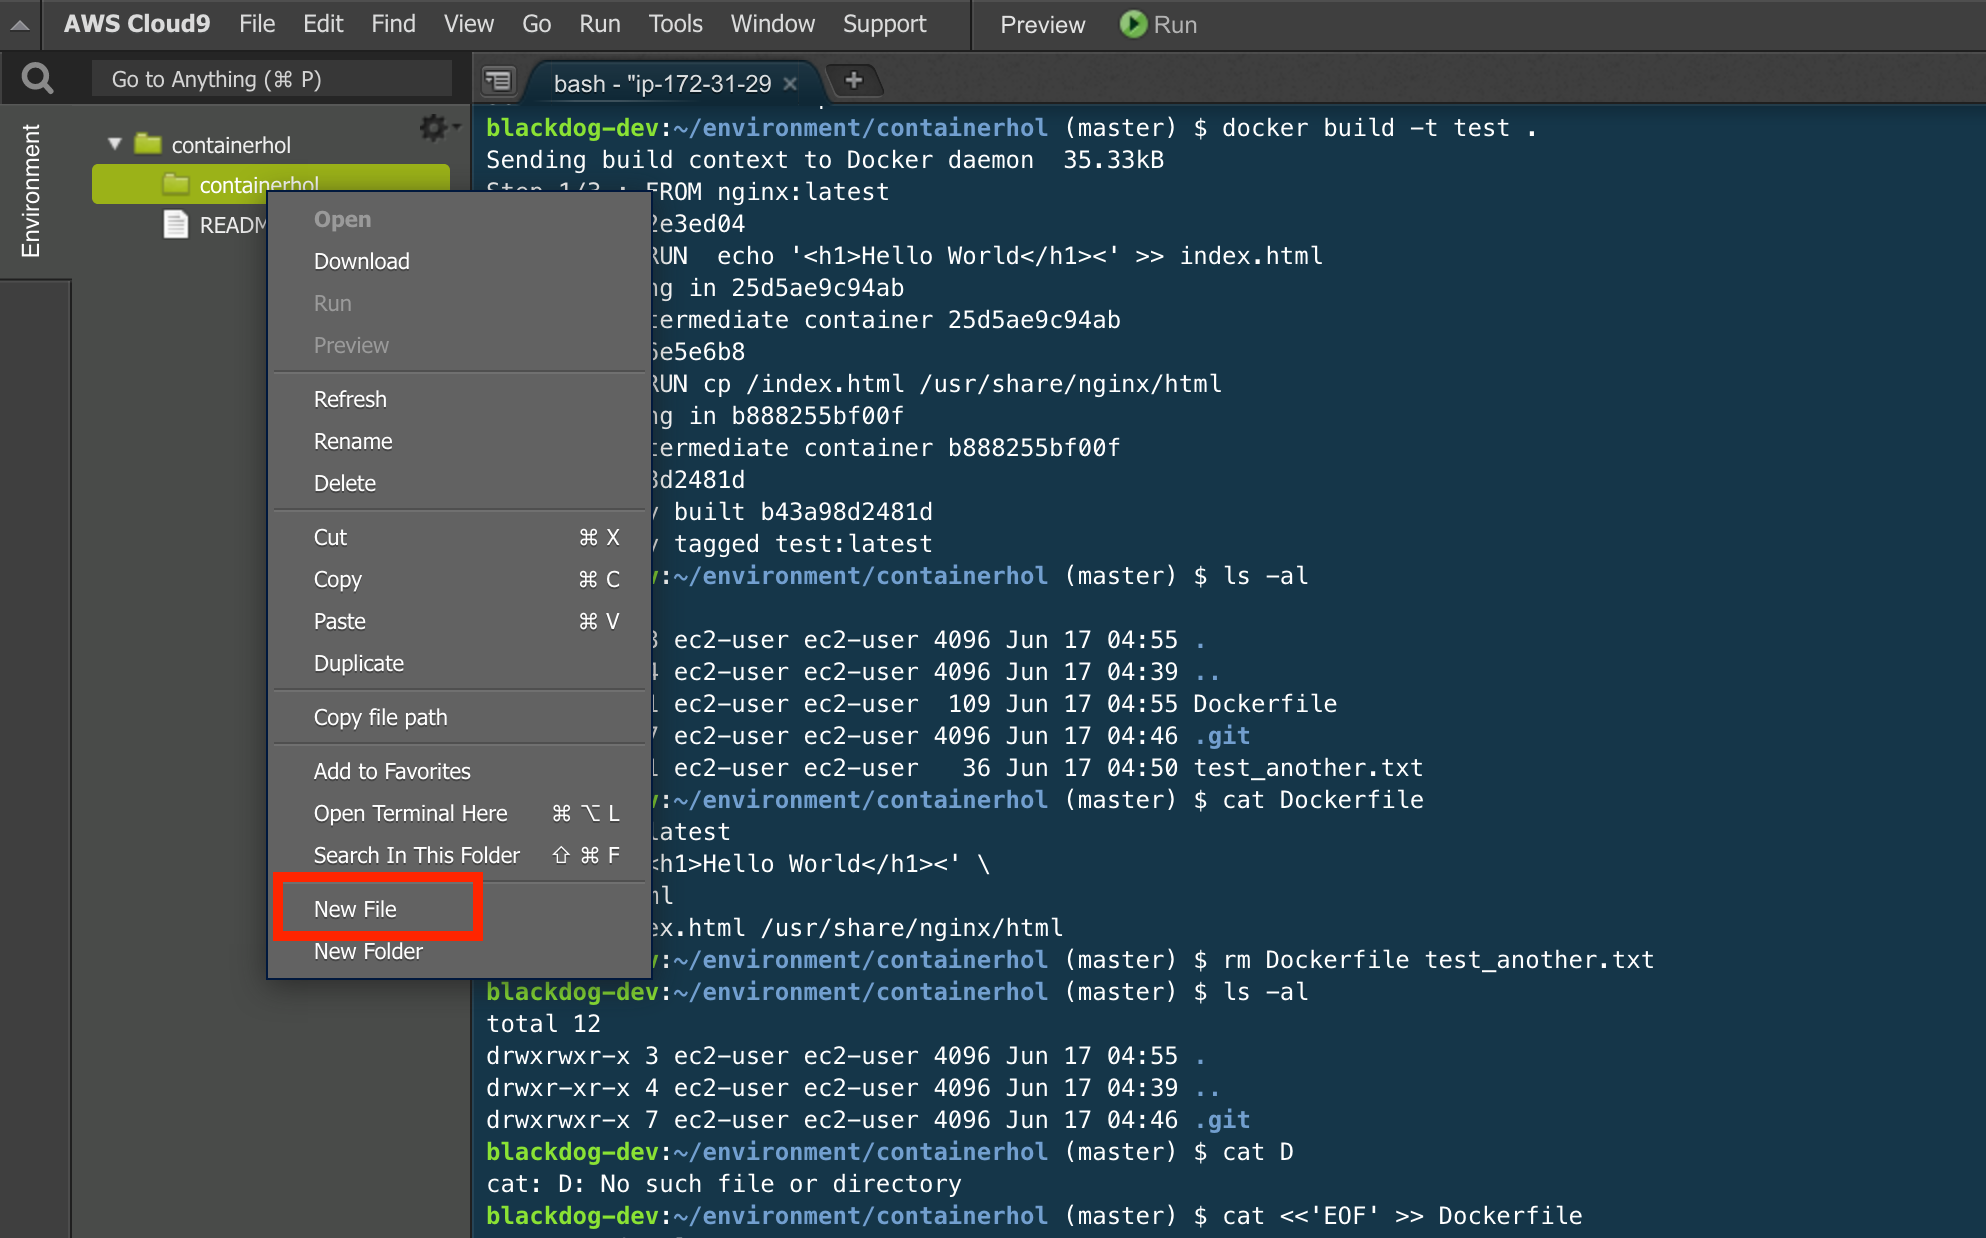
워크스페이스의 왼쪽 메뉴 탐색창에서 repository의 디렉토리를 선택하고 마우스 오른쪽 버튼을 눌러서 New File 메뉴를 눌러 새로운 파일을 추가합니다. 다시 오른쪽 버튼을 눌러 Rename을 선택하고 파일 이름을 Dockerfile 로 지정합니다.

확장자와 대소문자에 유의해서 입력합니다. 파일명은 Dockerfile 입니다. 확장자가 없습니다.
-
Dockerfile을 더블클릭해서 편집창을 열고 다음의 내용을 복사하여 붙여넣고 저장합니다.
FROM nginx:latest RUN echo '<h1>Hello World</h1>' \ >> index.html RUN cp /index.html /usr/share/nginx/html -
5에서 했던 방법으로 **buildspec.yml” 파일을 추가합니다.
대소문자에 유의해서 입력합니다. 파일명은 buildspec.yml 입니다.
본 워크샵은 AWS Oregon Region ( us-west-2 ) 기준으로 작성이 되었습니다. 실습시 유의해주시길 바랍니다.
-
buildspec.yml 을 더블 클릭해서 편집창을 열고 다음의 내용을 복사합하여 붙여넣고 저장합니다.
들여쓰기 및 띄워쓰기 간격이 아래의 텍스트와 동일하도록 입력합니다!
version: 0.2 phases: pre_build: commands: - echo Logging in to Amazon ECR... - aws --version - $(aws ecr get-login --region $AWS_DEFAULT_REGION --no-include-email) - REPOSITORY_URI=<YOUR_ACCOUNT_ID>.dkr.ecr.us-west-2.amazonaws.com/containerhol/webapphol - COMMIT_HASH=$(echo $CODEBUILD_RESOLVED_SOURCE_VERSION | cut -c 1-7) - IMAGE_TAG=${COMMIT_HASH:=latest} build: commands: - echo Build started on `date` - echo Building the Docker image... - docker build -t $REPOSITORY_URI:latest . - docker tag $REPOSITORY_URI:latest $REPOSITORY_URI:$IMAGE_TAG post_build: commands: - echo Build completed on `date` - echo Pushing the Docker images... - docker push $REPOSITORY_URI:latest - docker push $REPOSITORY_URI:$IMAGE_TAG - echo Writing image definitions file... - printf '[{"name":"hol-webapp","imageUri":"%s"}]' $REPOSITORY_URI:$IMAGE_TAG > imagedefinitions.json artifacts: files: imagedefinitions.json -
phases -> pre_build -> commands 의 4번째 라인의 “<YOUR_ACCOUNT_ID>” 대신에 본인의 AWS 어카운트 ID를 입력하고 앞에서 생성한 ECR 리포지토리의 주소를 입력합니다. 다음과 같은 형식이 됩니다.
“- REPOSITORY_URI=01234567890.dkr.ecr.us-west-2.amazonaws.com/containerhol/webapphol”
-
buildspec 및 Dockerfile 파일을 커밋한 후에 소스 리포지토리에 푸쉬 합니다. 다시 위에서 작업을 하던 Cloud9의 워크스페이스로 돌아와 터미털을 열고 다음을 참조하여 username과 email 주소를 설정합니다.
- Git repository클론된 디렉토리로 이동합니다.
cd ~/environment/containerhol/- git crendential을 저장하기 위하여 다음과 같이 user name과 email을 글로벌로 설정합니다.
git config --global user.name "Kwangyoung Kim" git config --global user.email "example@amazon.com"- 파일을 추가합니다.
git add .- 변경 내용을 커밋합니다.
git commit -m "Adding build specification and docker file"- 커밋을 푸시합니다. 앞에서 Code Commit 리포지토리를 만들때 다운로드 받아뒀던 csv 파일을 참조하여 유저네임과 패스워드를 입력합니다.
git config credential.helper store git push origin master- 다음과 같은 화면을 볼 수 있습니다.
Counting objects: 4, done. Compressing objects: 100% (4/4), done. Writing objects: 100% (4/4), 877 bytes | 877.00 KiB/s, done. Total 4 (delta 0), reused 0 (delta 0) To https://git-codecommit.us-west-2.amazonaws.com/v1/repos/containerhol * [new branch] master -> master Branch master set up to track remote branch master from origin. -
다음 링크를 통해서 이동하여 정상적으로 푸쉬된 파일들을 확인해 봅니다. https://us-west-2.console.aws.amazon.com/codesuite/codecommit/repositories?region=us-west-2